
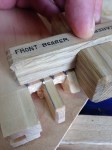
 While working through the design elements of the Hillbilly Tansu I paid particular attention to how the joinery was laid out. The last thing I wanted to do was create something that would require multiple gauges and several different tool setups. What I ended up with is actually quite simple. All of the plowed grooves are the same width, depth and distance from the face edge of the pieces. So one setting of the plow plane handles all. The eight outside corner joints require one gauge and setting. Simple. The side bearers have a stub tenon that is in-line with the groove. Again, simple. The front and rear bearers have a tenon and bridle joint arrangement that require some fussy gauge setups. However, I designed these elements so that any variance in their width will be moved to the interior of the carcass. This means that the only element that will need to be fitted is the dust/floor panel that spans between them. In other words, the joinery is fixed and will not need to be adjusted due to variances in the width of the post or bearer elements.
I utilize proportional layouts when designing my projects. In order to do so I have to start with some fixed dimension or distance. The overall height or width is often used. In the Hillbilly Tansu the controlling dimension is the width of the square corner posts, 36mm. I use metric for joinery layout because my chisels and plow blades are metric. It just makes life easier. So what does this have to do with the price of eggs in China?
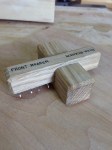
I know that the distances of the joinery for the front and rear bearers is fixed and I also know what those distances are. Since I do not plan to vary the size of the corner posts, no matter the configuration of the carcass, I can make a dedicated marking gauge for the front and rear bearer joinery.
I went through several design sketches, some simple, some not so much. Eventually I distilled everything down to a simple double ended gauge that works beautifully. I set the pins at 45deg, same as with the other gauges I make. The beam and fence are joined in a simple lap joint configuration that locks the two pieces 90deg to each other. The joint is compression fit, but I added a little glue for insurance. The pins are finish nails and easy to file and can be removed and replaced, when the need arrises. Simple and effective.


Greg Merritt

Interesting series in this Hillbilly Tansu.
I also really like your illustrations.
Thanks Mathieu. I’m just making it up as I go along. My hope is to develop a system for building these chests that will allow me to quickly adapt them to any configuration as the need arrises.
Greg
Looking forward to the next posts and to see how your system develops.
Pingback: HB Tansu Progress-1 | GREG MERRITT – BY MY OWN HANDS
Pingback: HB Tansu #3-Progress 1 | GREG MERRITT – BY MY OWN HANDS